Building Real-time Assist for Automated Recommendations during Live Conversations
Real Time Assist (RTA) is a generative-AI powered solution to provide instant, context-sensitive support and guidance to agents during live interactions such as customer service and sales calls. In the realm of sales, RTA acts as a dynamic assistant, offering sales representatives immediate access to crucial information, response suggestions, and strategic guidance, while they are engaged in calls with potential customers. The solution helps bridge the gap between sales training and real-world application, ensuring representatives are always equipped with the best tools to succeed.
The purpose of this guide is to provide developers with a step-by-step approach to build an RTA solution using Symbl. We will use Symbl’s:
- Trackers to trigger the RTA flow
- Streaming API to stream a real time conversation
- Subscribe API to fetch live data
- Nebula, Symbl’s proprietary large language model (LLM), along with retrieval-augmented generation (RAG), to provide instant guidance to agents based on the identified events
Keywords: Large Language Model, Retrieval Augmented Generation, Vector Embedding, Vector Database, Similarity Search, WebSocket, API
Prerequisites
- Sign up on the Symbl.ai platform. Retrieve your AppId and AppSecret, and request access to a Nebula API key.
- Install the Symbl.ai JavaScript SDK.
- Verify that the communication platform hosting the call between the agent and the customer can stream audio in real-time via WebSocket. In this guide, we will use Twilio media streams for agent and customer communication channels.
- Get access to a knowledge base to add additional context to Nebula.
- Get access to a vector database platform to store your knowledge base in the form of vector embeddings. For this implementation, we will use MongoDB Atlas as an example. To create a MongoDB Atlas account, visit this link. Find your MongoDB URI by clicking Connect > Drivers > Add your connection string.
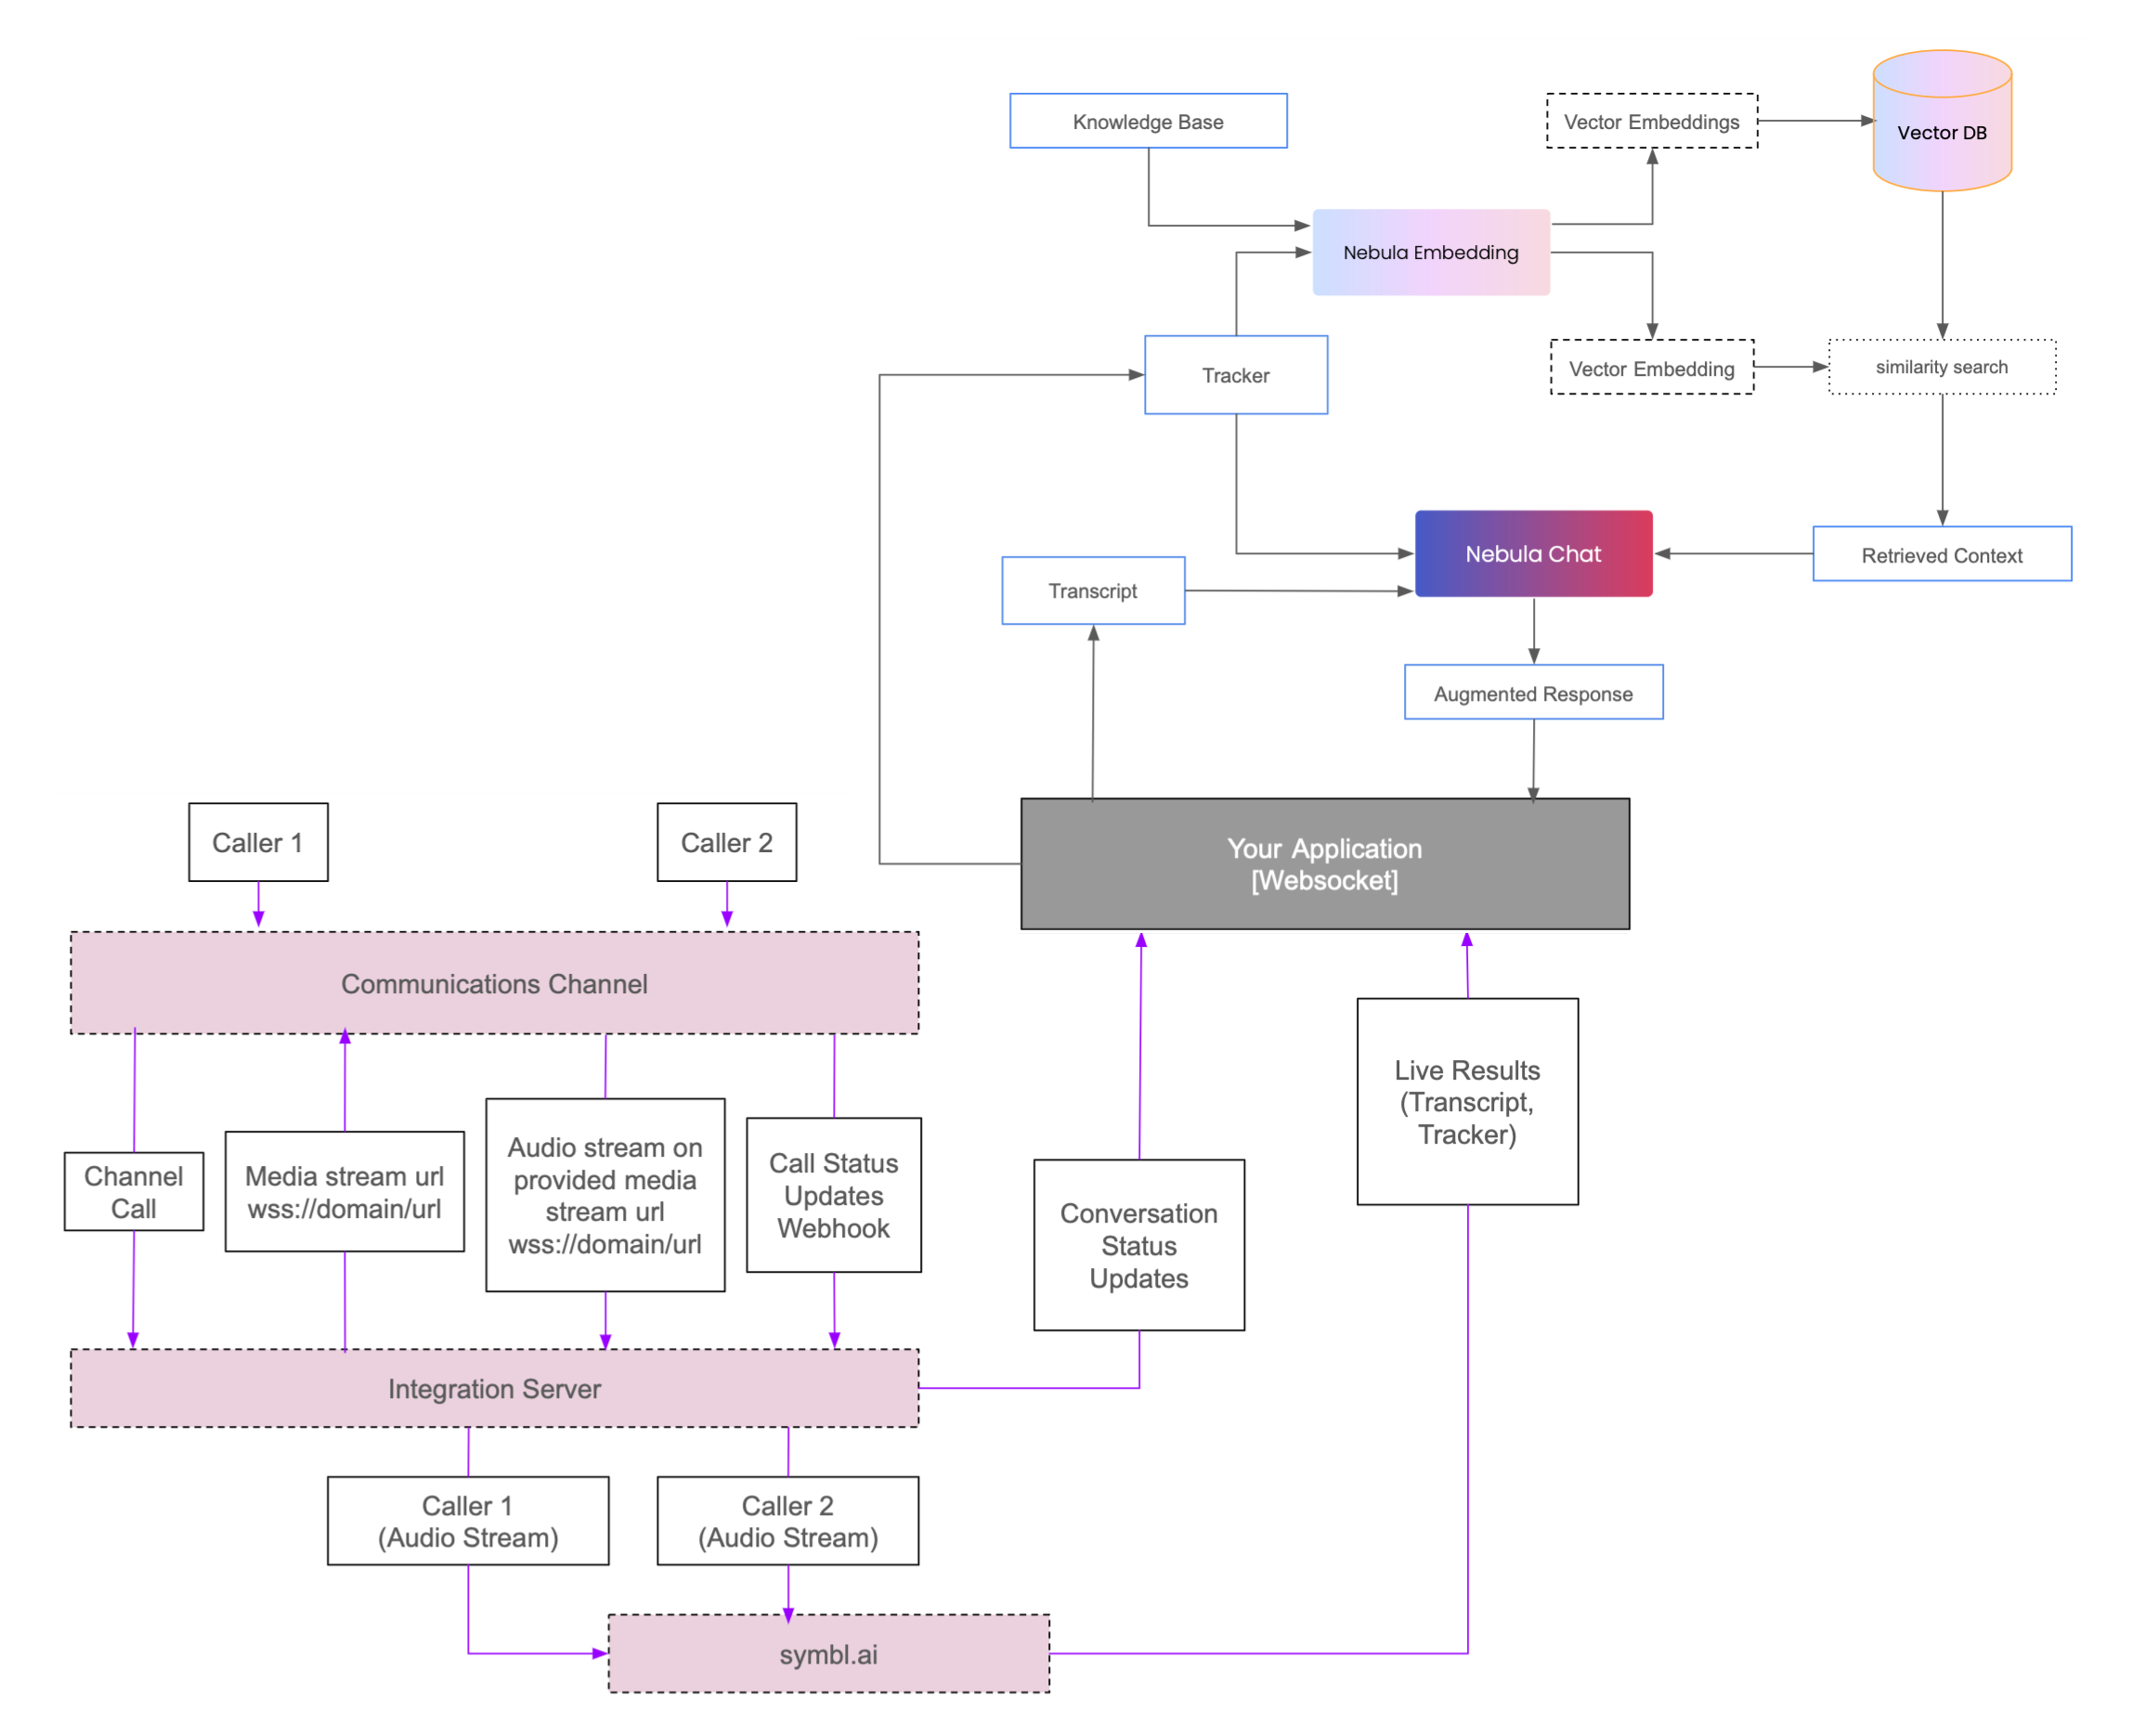
Architectural Flow

Components
- Nebula Embedding - Symbl’s Embedding Model API
- Vector DB - Vector Database to store vectorized knowledge base
- Nebula Chat - Symbl’s Chat Model API
- Communications Channel - The medium for streaming audio data from Caller 1 and Caller 2
- Integration Server - Server which acts as a bridge between the communications channel and Symbl.ai
- Symbl.ai - Symbl’s Streaming API connection
- Your Application - An application with a listener WebSocket connection that subscribes to results from the integration server and Symbl.ai, using Symbl’s Subscribe API, and also interacts with Nebula Chat
Implementation Guide
Step 1: Setting Up Triggers and Database for RTA
This guide uses Trackers, Symbl's intent detection engine, to automatically identify events in a live conversation where an agent might need RTA support. For example, Trackers can automatically detect sales objections in a conversation, without polling a language model after every sentence of the transcript. Tracker detection then triggers RTA, which proactively provides relevant information or suggestions to the agent within 1-2 seconds. Each tracker has an associated vocabulary, consisting of words and phrases monitored during the conversation.
- Define the trackers to be used in your implementation. These trackers should align with the data in your knowledge base. In this implementation, our knowledge base consists of one file with sales objections in one column and corresponding guidelines to handle those objections in another column. The sales objections are used to define tracker names. For example, the objection on handling budgets or costs involved is mapped to a tracker named “Budget Constraints”.
- Configure these trackers by logging in to your Symbl.ai account. Navigate to Trackers Management > Managed Trackers Library and select the managed trackers you would like to use. Create custom trackers by navigating to Trackers Management > Create Custom Tracker.
Here is an example configuration for a custom tracker:
Tracker Name: Budget Constraints
Description: Used to identify phrases related to customer expressing budget constraints
Categories: Sales
Language:(your preferred language)
Vocabulary:“need to consider budget”, “costs involved”, “seems expensive”
Trackers can also be configured in bulk, programmatically, using the Trackers API.
-
Identify chunks in your knowledge base that align with the intent of any of the trackers defined above. Vectorize these chunks into embeddings and store them along with associated data in a vector database, allowing for efficient similarity search. In this implementation we use MongoDB Atlas as our vector database platform.
-
Establish a connection to MongoDB using the URI credentials and set up a connection to a specific database and collection. If the database and collection do not already exist, they will be created.
mongoclient = pymongo.MongoClient("MONGODB_URI") #replace with your MongoDB URI db = mongoclient['samples'] #replace with your database name collection = db['business_knowledge'] #replace with your collection name -
Define the following function that sends text to the Nebula Embedding model API and retrieves an embedding for the given text.
embedurl = "https://api-nebula.symbl.ai/v1/model/embed" def create_embeddings(text): headers = { 'ApiKey': NEBULA_API_KEY, #replace with your Nebula API Key 'Content-Type': 'application/json' } payload = json.dumps({ "text": text }) response = requests.request("POST", embedurl, headers=headers, data=payload) embedding = response.json()['embedding'] return embedding -
Define a function to read data from files in your knowledge base. In this implementation, as explained above, the sales objections in the first column are mapped to the defined trackers. Thus, we create an embedding for every sales objection, along with the corresponding guidelines in the second column as associated data. For other storage formats, parse through the files accordingly and implement relevant logic.
-
Insert documents containing these embeddings and associated data into the MongoDB collection created above.
def insert_documents(fname): with open(fname, 'r') as file: csv_reader = csv.reader(file) next(csv_reader) rows = 0 for row in csv_reader: rows += 1 text = row[0] embedding = create_embeddings(text) document = { 'data': row[1], 'embedding': embedding } collection.insert_one(document) -
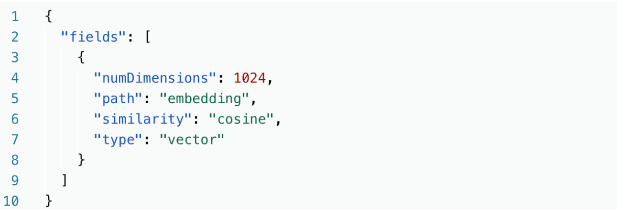
Configure a vector database search index to perform a similarity search over these embeddings when needed. Navigate to the database in your collection on the Atlas page and follow instructions to create an Atlas Vector Search Index. Provide an index name - this implementation uses “vector_index”, and add a JSON configuration
-
numDimensions: length of the vector embeddings - 1024 for Nebula Embedding Model
-
path: field over which the similarity search is carried out
-
similarity: similarity metric used

The trackers and the vector database associated with your knowledge base are now ready, thus completing the initial set up.
-
-
Step 2: Streaming Customer and Agent Audio to Symbl
-
Get access to the audio channels to initiate communication. Refer to this GitHub repo for instructions on accessing and setting up connections to Twilio media streams. For other communication platforms, follow their relevant documentation.
-
Set up audio Streaming API connections for each communication channel - customer and agent - using the following helper class. Ensure both streaming connections share the same “connectionId”, henceforth referred to as the ‘Symbl connection’.
const uuid = require('uuid').v4;
const {SDK} = require('@symblai/symbl-js');
const API_BASE_URL = '<https://api.symbl.ai'>

 class SymblConnectionHelper {
    constructor({speaker, handlers}) {
        this.connection = undefined;
        this.speaker = speaker;
        this.handlers = handlers;
        this.\_hash = uuid();
        this.sdk = new SDK();
        console.log('Cache', this.sdk.cache.cacheStore.store);
        (async () => {
            return this.sdk.init({
                appId: process.env.SYMBL_APP_ID,
                appSecret: process.env.SYMBL_APP_SECRET
            });
        })();
    }
    async startConnection(id, {speaker, config} = {}) {
        this.speaker = speaker;
        this.connection = await this.sdk.startRealtimeRequest({
            id,
            basePath: API_BASE_URL,
            config: {
                meetingTitle: 'My Test Meeting',
                confidenceThreshold: 0.7,
                timezoneOffset: 480, // Offset in minutes from UTC
                languageCode: "en-US",
                sampleRateHertz: 8000,
                encoding: 'MULAW',
                sentiment: true,
                trackers: {
                    enableAllTrackers: true,
                    interimResults: true                },
                ...config
            },
            speaker: this.speaker,
            handlers: {
                'onSpeechDetected': this.onSpeechDetected.bind(this),
                'onMessageResponse': this.onMessage.bind(this),
                'onTrackerResponse': this.onTracker.bind(this)
            }
        });
        return this.connection;
    }
   sendAudio(data, encoding = 'none') {
        if (encoding !== 'none') {
            const buffer = Buffer.from(data, encoding);
            this.connection.sendAudio(buffer);
        } else {
            this.connection.sendAudio(data);
        }
    }

    onSpeechDetected(data) {
        if (this.handlers && this.handlers.onSpeechDetected) {
            setTimeout(() => {
                this.handlers.onSpeechDetected(data, {speaker: this.speaker, connection: this.connection});
            }, 0);
        }
    }

    onMessage(data) {
        if (this.handlers && this.handlers.onMessage) {
            setTimeout(() => {
                this.handlers.onMessage(data, {speaker: this.speaker, connection: this.connection});
            }, 0);
        }
    }

    onTracker(data) {
 if (this.handlers && this.handlers.onTracker) {
     setTimeout(() => {
         this.handlers.onTracker(data, {speaker: this.speaker, connection: this.connection});
     }, 0);
  }
    }

    async stopConnection() {
        return this.connection.stop();
    }

    get hash() {
        return this._hash;
    }
}

module.exports = SymblConnectionHelper;
-
Ensure that the following object is specified within config to enable the trackers created in the previous step.
trackers: { enableAllTrackers: true, interimResults: true //reduces latency in tracker detection } -
Set up an integration server. The integration server acts as a bridge between the communication channels from the communication platform and the Symbl connection. Refer to this Github repository to setup an integration server between Twilio and Symbl.
Step 3: Subscribing to Conversation Status Updates and Live Events
When conversation begins, data from the integration server and the Symbl connection is pushed to listener WebSocket connections, allowing the RTA to respond to live events such as transcript and tracker responses.
-
Implement the following class which defines a listener websocket connection.
import isNode from 'detect-node'; export default class WebSocket { constructor(options = {}) { if (!options.url) { throw new Error('url is required in the options.'); } this.isNode = isNode; this.url = options.url; this.accessToken = options.accessToken; this.options = options; this.connect = this.connect.bind(this); this.onConnect = this.onConnect.bind(this); this.onError = this.onError.bind(this); this.onMessage = this.onMessage.bind(this); this.onClose = this.onClose.bind(this); this.send = this.send.bind(this); this.disconnect = this.disconnect.bind(this); this.connect(); } onError(err) { if (this.options['onError']) {} this.options['onError'] ? this.options['onError'](err) : console.error(err); } onMessage(payload) { // Incoming results for this connection const data = payload.data; this.options['onMessage'] ? this.options['onMessage'](data) : console.debug(data); } onClose() { this.options['onClose'] ? this.options['onClose']() : console.info('Connection Closed.'); } onConnect(connection) { this.webSocketConnection = connection; this.webSocket.onerror = this.onError; this.webSocket.onmessage = this.onMessage; this.webSocket.onclose = this.onClose; this.options['onConnect'] ? this.options['onConnect'](connection) : console.info('Connection established.'); } connect() { if (!!window && window.WebSocket) { let url = this.url; if (this.accessToken) { url = `${this.url}?access_token=${this.accessToken}` } this.webSocket = new window.WebSocket(url, null, null, { 'X-API-KEY': this.accessToken }); } this.webSocket.binaryType = 'arraybuffer'; this.webSocket.onopen = this.onConnect; } send(data, cb) { if (!data) { cb && cb({ message: 'undefined data detected.' }); } else { try { if (this.webSocket.readyState === 1) { this.webSocket.send(data); } else { console.warn('WebSocket Connection not open. Couldn\'t send data.'); } } catch (e) { console.error('Error while sending the data.', e); } } } disconnect() { this.webSocket.close(); } } -
Subscribe to conversation status updates from the integration server, and live events from the Symbl connection through the Subscribe API, using the following methods.
-
Define this method which instantiates a listener connection defined in the class above, to subscribe to the server.
export const subscribeToServerUpdates = async (onUpdate) => { if (!onUpdate || typeof onUpdate !== 'function') { throw "'onUpdate' parameter must be a valid function."; } return new Promise((resolve, reject) => { return new WebSocket({ url: ServerSubscriptionUrl, onError: (e) => { console.error('Error in connecting to server.', e); reject(e); }, onConnect: (c) => { console.log('Connected to server.', c); resolve(c); }, onMessage: (\_data) => { const data = JSON.parse(\_data); console.log('Message from server', data); onUpdate(data); } }); }); }; -
Also define the following method to instantiate a listener connection that subscribes to the Symbl connection.
export const subscribeToSymblConnection = async (connectionId, onUpdate) => {
    if (!connectionId) {
        throw "'connectionId' parameter is mandatory.";
    }
    if (!onUpdate || typeof onUpdate !== 'function') {
        throw "'onUpdate' parameter must be a valid function.";
    }
    const accessToken = await generateAccessToken();

    return new Promise((resolve, reject) => {
        return new WebSocket({
            url: `${apiBase.replace('http', 'ws')}/v1/subscribe/${connectionId}?access_token=${accessToken}`,
            onError: (e) => {
                console.error(`Error while subscribing to Symbl Connection: ${connectionId}`, e);
                reject(e);
            },
            onConnect: (c) => {
                console.log(`Subscribed to Symbl Connection: ${connectionId}.`, c);
                resolve(c);
            },
            onMessage: (_data) => {
                const data = JSON.parse(_data);
                onUpdate(data);
            }
        });
    });
};
-
-
When the subscribeToServerUpdates method is invoked, an update is received from the server. On receiving an update from the server, subscribeToSymblConnection is invoked and data from the Symbl connection is fetched.
await subscribeToServerUpdates(this.onUpdateFromServer); async onUpdateFromServer(updateEvent) { const {type, speaker, connectionId, conversationId} = updateEvent; if (type === 'connection_started' || type === 'connection_exists') { if (!this.state.isConnectionStarted) { this.setState({ startedTimestamp: moment(), isConnectionStarted: true, connectionId, conversationId }); await subscribeToSymblConnection(connectionId, this.onSymblEvents) } this.addEvent({ type: 'call_established', title: 'Call Connected.', description: `Connected call with '${speaker.name}'` }); const user = this.buildUserFromMessage({ user: { ...speaker }, }); user.politenessCount = 0; user.empathyCount = 0; user.satisfactionCount = 0; let existingUser = this.state.users.filter(user => user.phoneNumber === speaker.userId); if (existingUser.length <= 0) { this.state.users.push(user) } else { existingUser[0].status = 'connected'; } this.setState({ users: [...this.state.users] }); } else if (type === 'connection_stopped') { if (this.state.conversationId) { const summary = await getSummary(this.state.conversationId); this.setState({ summary: summary }); } } } -
Define the following method to handle live events fetched from the Symbl connection. When a tracker_response is received, it signifies that Symbl has detected the defined tracker.
onSymblEvents = async (data) => {
   const {type} = data;
   switch (type) {
	case 'message':
          const { message } = data;
	   // Handle message data
case 'message_response';
   const { messages } = this.state;
   let { messages: \_messages } = data;
	   // Handle message response data
	case 'tracker_response';
	    const { tracker, isFinal, sequenceNumber } = data
         // Handle tracker response data
    }
};
Step 4: Generating RTA Responses
On tracker detection, we use Retrieval Augmented Generation (RAG) to retrieve data associated with the tracker from the vector database built in Step 1. The retrieved data is then added as context to the Nebula LLM to generate an RTA response.
- Define the following function to perform a vector search in MongoDB using the vector search index created in Step 1. This function takes the tracker detected above as input. It vectorizes the tracker and retrieves the embedding closest to the tracker, present in the vector database. The data and metadata associated with this embedding constitute the context retrieved from the vector database.
def vector_index_search(tracker): tracker_embedding = create_embeddings(tracker) retrieved_context = collection.aggregate([ { "$vectorSearch": { "queryVector": tracker_embedding, "path": "embedding", "numCandidates": 10, #total number of embeddings in the database "limit": 1, #number of closest embeddings returned "index": "vector_index" } }]) return retrieved_context - Use the retrieved context to generate responses using Nebula. Define the following function to interact with the Nebula Chat model API based on the additional context retrieved from the vector database, and the detected tracker.
- Implement additional logic to also pass the current conversation transcript as context. This function returns an augmented response generated by the Nebula LLM. The response is then displayed to the agent, to communicate to the caller in real-time.
def chataugmentation(retrieved_context, transcript, tracker):
    headers = {
    'ApiKey': NEBULA_API_KEY, #replace with your Nebula API Key
    'Content-Type': 'application/json'
    }
    payload = json.dumps({
    "max_new_tokens": 1024,
    "system_prompt": """
You are assisting a support agent. Based on the following context, provide information to the agent, to convey to the user - one step at a time. Be very brief and concise in your instructions. Do not generate information on your own. Context: """ + retrieved_context + transcript,
    "messages":[
      {
        "role": "human",
        "text": "Hi. I am a support agent. I want to help my customer based on the context."
      },
      {
        "role": "assistant",
        "text": "Hi, I am a conversation expert agent. I would be happy to help you"
      },
      {
        "role": "human",
        "text": tracker
      }
    ],
    "top_k": 1,
    "top_p": 1,
    "temperature": 0,
    "repetition_penalty": 1.2
    })
    response = requests.request("POST", url = "<https://api-nebula.symbl.ai/v1/model/chat">, headers=headers, data=payload).json()
    return response['messages'][-1]['text']
This guide demonstrates Symbl’s Real-Time Assist solution to assist agents in live interactions. The implementation can be customized or further extended for specific use cases.
For any comments or concerns, write to us at [email protected].
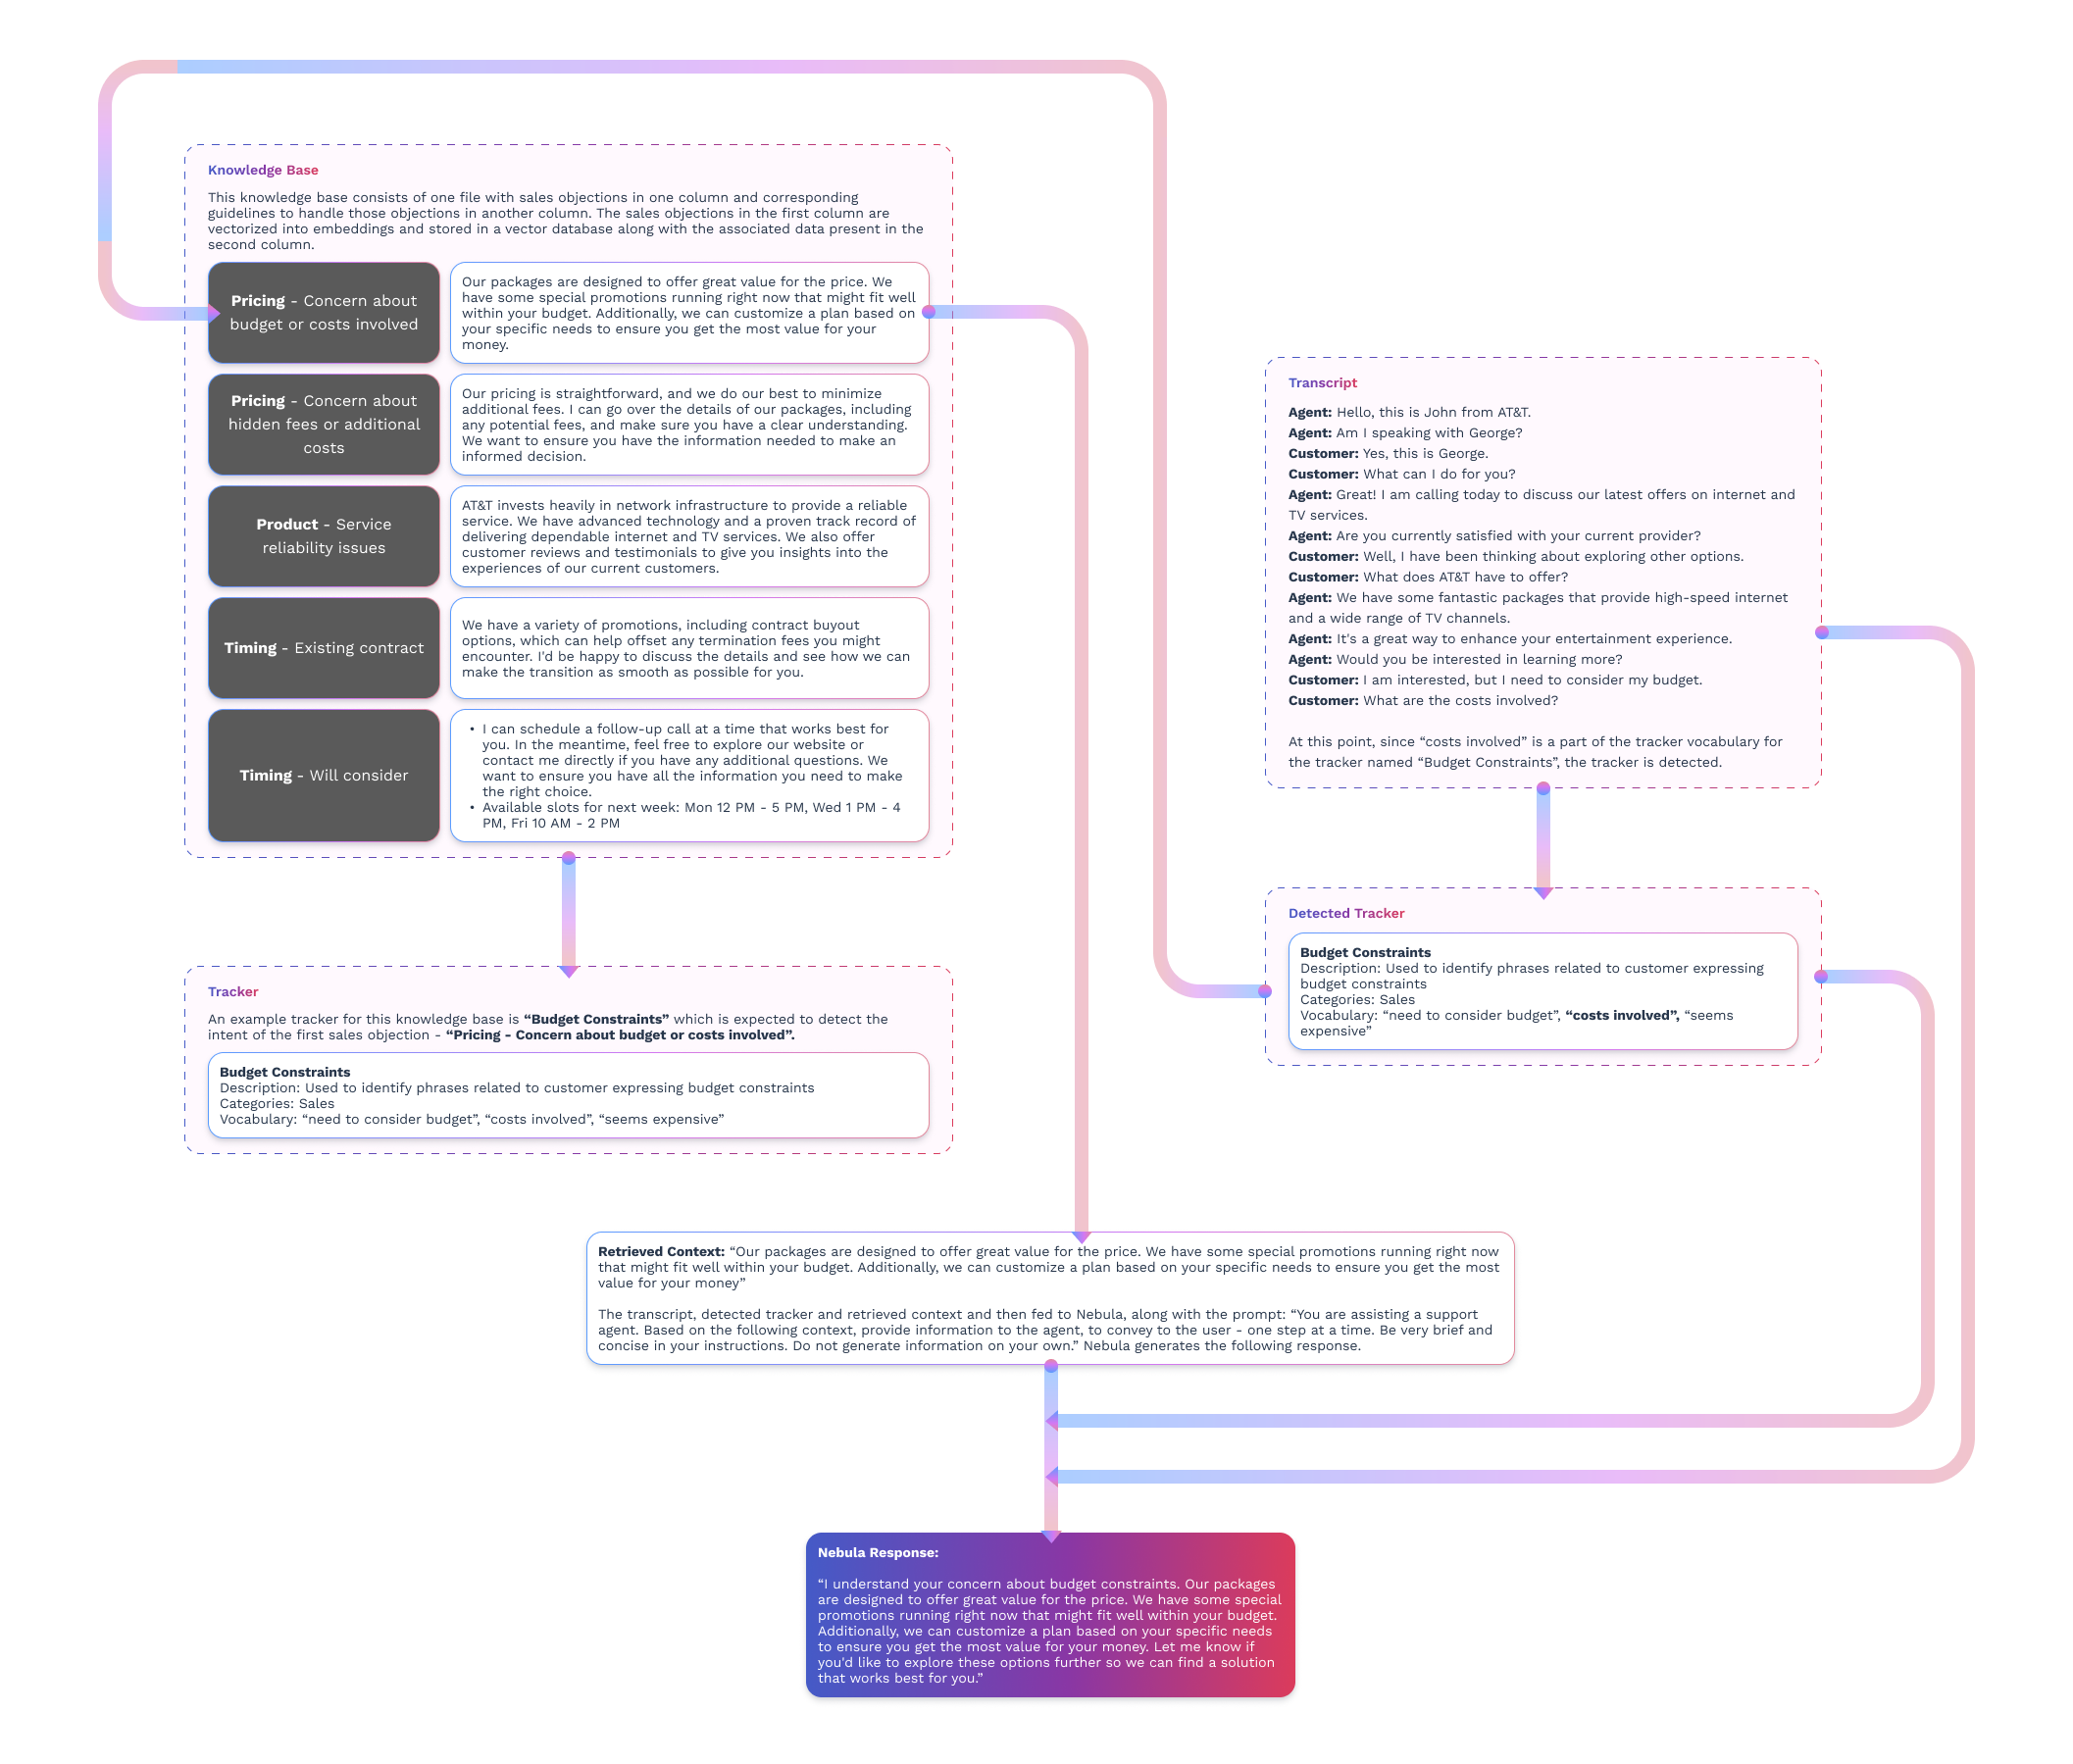
Sample RTA Response Generation

Updated 11 months ago
